Remote Files Sharing by Windows or Samba over SSH tunnel.
By Dmitri Dmitrienko
|
The problem of providing remote access to the files is nothing new, but the implementation of the solution quite often also determines reliability, safety and productivity. In this article we will look at accessing a remote computer (Unix, Linux or Windows) over non-trusted network.
If you are not comfortable with the security of your data (files content, passwords etc.) sent by Windows SMB or Unix Samba over the networks, the crypted SSH (the Secure Shell) could be your panacea. Another reason to use SSH is its wide spread implementation and reliability. Finally there are situations when SSH is the only means of getting the access to the resources when all other ports are blocked by the firewall. PHP developers using PhpED - NuSphere's PHP IDE are familiar with PhpED's PHP IDE SSH functionality, which allows them to use SSH to access remote computers directly from the IDE.
So, we have remote server and local client machines. First of all we need to have ssh daemon running on the server. Most of Unix and Linux servers are equipped with openssh binaries[1] are available for almost all platforms. For Windows there is a distribution of CygWin[2] and the overview of running unix daemons on Windows available here[3]
For starters lets assume that there is a direct connection possible between the client and the server. All examples in this article are based on console implementation of ssh, such as putty link[4] or openssh[1] or its Cygwin[2] version. Simple ssh connection is created by execution of the following command:
ssh <account>@<server>
If TCP tunnel is necessary you should use the command-line option -L (local to the remote way):
ssh -L <localbind>:<localport>:<remotebind>:<remoteport> <account>@<gateway>
For example, if you server's address is 222.11.33.44 and the account is myuser, then the command setting the tunnel at port 139 will look like this:
ssh -L localhost:139:localhost:139 myuser@222.11.33.44
First pair - localhost:139 - sets the local IP and local TCP port for Listening socket, the second pair localhost:139 determines where the connection will be forwarded with respect toand by the ssh daemon, which in this example means forwarding it to port 139 of the ssh daemon's server.
Even if your server is a part of the local network, such as Intranet and not visible outside of the local network you can still build the SSH tunnel to it - as long as there is a gateway to the outside world. For example, if the server's address is 192.168.0.10 on the local network and gateway's IP in the external network is 222.11.33.99 the command line in this case will look like this:
ssh -L localhost:139:192.168.0.10:139 myuser@222.11.33.99
This command really means the following:
- establish SSH tunnel with is 222.11.33.99, using login myuser
- send all communications on client's (localhost) port 139 to the server's (192.168.0.10) port 139.
The choice of port number 139 is done on purpose. Port 139 is the port used for file sharing. Setting up SSH tunnel through this port provides the access to the remote shared drives. SSH will pickup your request on local host to look at the files and transport it to the file sharing port of the remote server. You will be looking at the local file system but you will be seeing the files from the remote server. However, there is one problem:
Port 139 is already used by Windows to share the local files. We, however, are looking for the ways to see the files from the remote server, possibly from several remote servers and we need the same port. The way to avoid the collision with the Windows is in taking advantage of the network Adapter, which will allow us to create "multiple" ports 139.
Lets open Control Panel, Add Hardware:
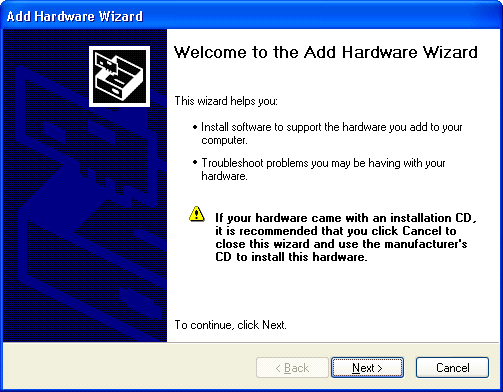
Windows will scan the hardware, but not to worry, if it doesn't find anything new it will prompt you:
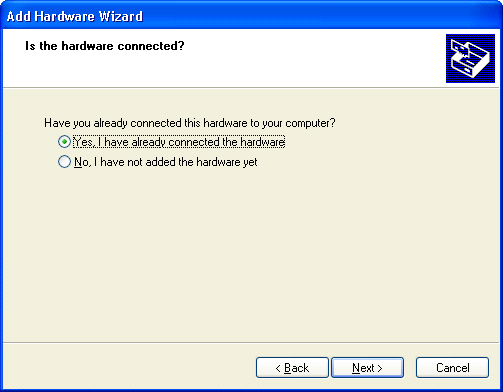
Just select "Yes I have already connected the hardware" and now the Windows will be curious about the nature of the hardware
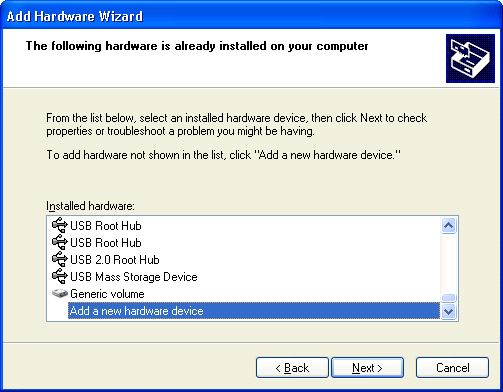
Select Add a new device and Install the hardware that I manually selected from a list on the next dialog, as shown below:
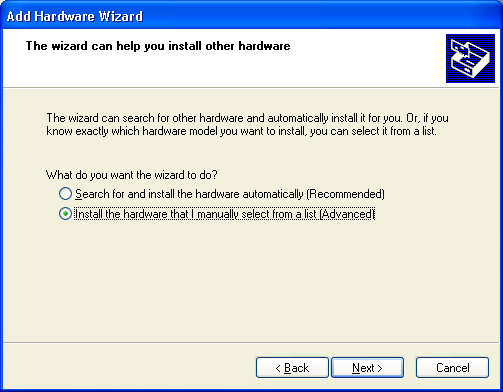
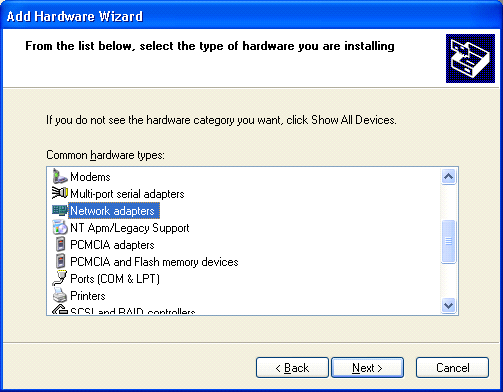
This is going to be the Network Adapter:
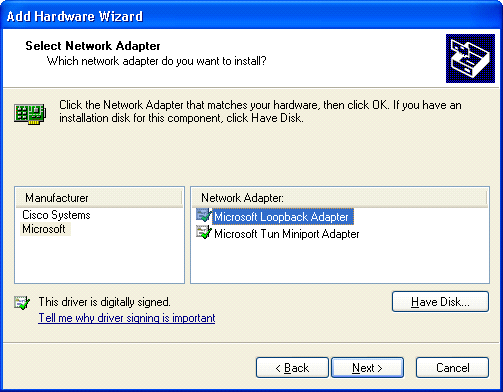
Select MS Loopback form the list of available adapters:
The only thing left for us to do now is installation of this device and we are just a step away from seeing it in the list of network Connections in Control Panel:
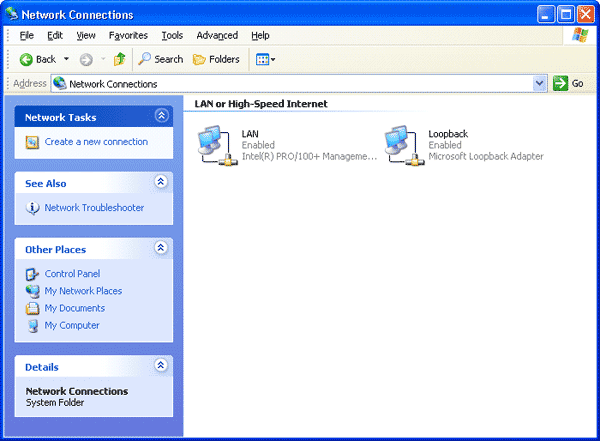
We can certainly rename this adapter into something more logical, e.g. My Server, however it doesn't really matter. Lets configure this adapter by selecting Rightclick->properties:
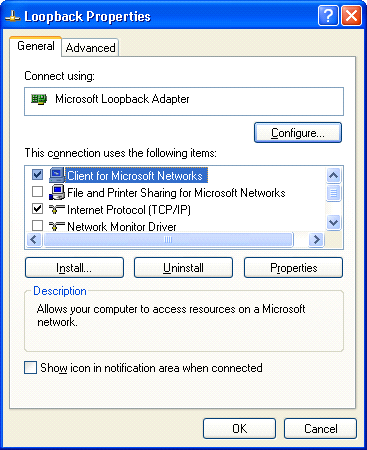
We need to turn off File and Printer Sharing because we are not planning on sharing any files with the server, on the contrary we want to see files on the server and we need the port 139 free for that purpose. All the system needs to work properly is Windows RPC Service provided by Client For Microsoft Networks and Internet Protocol (TCP/IP).
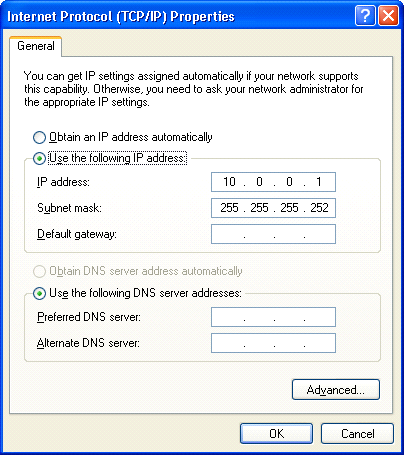
Setting up TCP/IP comes with its own bag of tricks. First, we need to select IP address from the range of addresses for local networks (non-routable or black hole). If port numbers 192.168.x.x are already used in your local network, you can use 10.x.x.x (and vice versa)
Lets open TCP IP Properties, turn off Obtain automatically and enter the adapter address by ourselves:
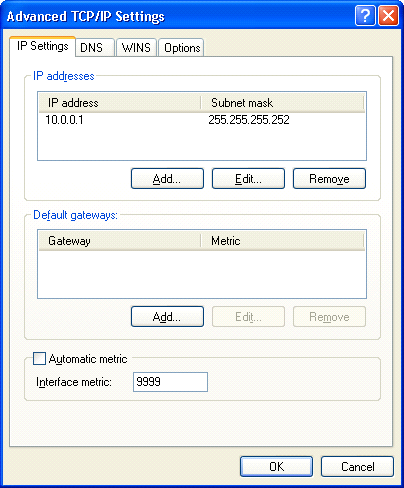
Select Adavanced, turn off Automatic metric and enter some really big number (9999). This is necessary to exclude this connection from being the default connection.
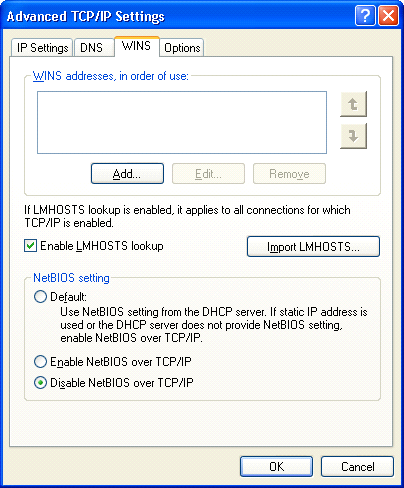
On the Wins tab, Turn off NetBios over TCP/IP:
Now we can select OK and close all windows, Disable the adapter and Enable it again - this way we won't have to reboot before we can start using the adapter. We can check that the settings are correct by running route print command. To it, just open the cmd shell (Start->Run... cmd) and type in route print (on he picture below, all irrelevant records are deleted):
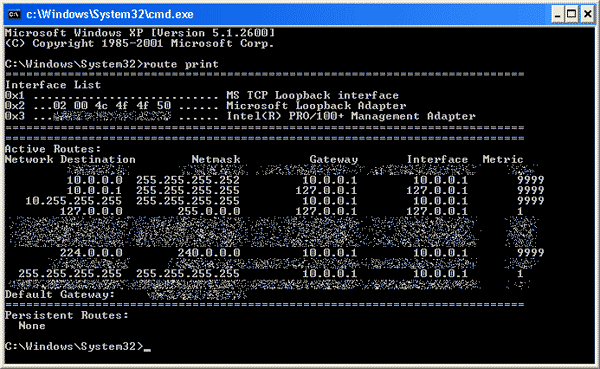
If you don't see the records with the address of new adapter, you need to reboot and check again.
Everything is ready for the launch of ssh tunnel:
ssh -L10.0.0.1:139:222.11.33.44:139 myuser@222.11.33.44
where 222.11.33.44 is the IP address, which you should be replaced with the address of your server and myuser is your account known to ssh.
If Samba (or Windows SMB) on the server is configured correctly then everything will just work at this point. Start the Explorer and type in \\10.0.0.1\
Common problems:
[1] Free version of SSH connectivity tools, http://www.openssh.com
[2] Cygwin, a linux like environment for Windows, http://www.cygwin.com
[3] Running SSHD under Windows, http://www1.umn.edu/oit/img/assets/5630/cygSSH.pdf
[4] Putty FAQ, http://www.chiark.greenend.org.uk/~sgtatham/putty/faq.html
[5] Samba, http://www.redhat.com/docs/manuals/enterprise/RHEL-4-Manual/ref-guide/s1-samba-servers.html
|
|
 Download NuSphere PHP IDE Download NuSphere PHP IDE
Download a free trial of the fast PHP EDitor and robust Integrated Development Environment for PHP.
|
 Buy NuSphere PhpED® now Buy NuSphere PhpED® now
|
"To be honest its bloody awesome, I have looked at loads of PHP editors and this is THE only one that actual works straight out of the box!!! Brilliant, well done."
Andrew Breward,
Director of Technology
caboodal.com
|
 Guide Guide
|
 Special Team4 Offer Special Team4 Offer
Get 4 copies of PhpED for the price of 3!
Optimum solution for development teams.
|

|
|
Need more than 4 licenses? Contact Us for more quantity discounts, please use "Ordering/Payment issue" subject on the form.
|
|
 Dr. Dobb's Dr. Dobb's

Dr. Dobb's Magazine covers NuSphere PhpED in New and Noteworthy section.
|
 InfoWorld InfoWorld

PhpED is a proper, world-class IDE for PHP code. It is the only IDE worth considering if PHP development is your primary job
|
|