|
|
|
Software Installation
Most of the software required can be installed normally with default settings. Here are a few hints to help things go smoothly.
- After installing PhpED and XAMPP you may get libmySQL.dll errors when trying to access MySQL via the PhpEd DB Client. If so, you should copy the libmySQL.dll file from the XAMPP MySQL Server /bin directory to your /Program Files/nusphere/phped directory and restart PhpED.
- XAMPP can be installed via the XAMPP windows installer or you can download a ZIP file and unzip it to your development directory. I created a directory on my S: drive for my web projects and development. So my XAMPP folder is: S:\Dev\xampp. Be sure to keep track of the directory where you install XAMPP.
- The main web document folder or document root for XAMPP Apache is the htdocs directory. On my system it is S:\Dev\xampp\htdocs . This is where we should be installing (unzipping) our Joomla files.
- We will unzip the Joomla files into a directory called Joomla in the XAMPP htdocs directory. On my system it is: S:\Dev\xampp\htdocs\joomla. It's not necessary to create a sub-directory called joomla, but it can make things easier if you decide to install multiple versions of Joomla in the future for testing.
- To make starting and stopping XAMPP easy we will create a few script shortcuts in PhpED. In PhpED click TOOLS > SETTINGS > INTEGRATION and add a new MENU with the name "Start XAMPP".

Under EXECUTE WITH choose SHELL and for the command line type the path to your xampp_start.exe file. Put a checkmark in "Show this command in Tools menu" so we can access it easily via the PhpED TOOLS menu. Repeat these steps to create a "Stop XAMPP" menu item.

After completing those steps you should see the two options under your PhpEd TOOLS > SCRIPTS menu.

Clicking the "Start XAMPP" option execute the XAMPP startup script which will run in a command/dos prompt window.

Selecting the "Stop XAMPP" option stops XAMPP and closes the command window. We will use these shortcuts during our development.
- An important step in setting up out environment is configuring the PHP debugger. PhpED comes with the necessary modules to enable debugging in the \debugger\server directory which is in the PHPEd installation folder. XAMPP can run using PHP4 or PHP5. For this tutorial we will configuring for PHP5 (PHP version 5.2.1 in the current XAMPP) so we will need to copy the \debugger\server\Windows\x86\dbg-php-5.2.dll file to your XAMPP installations \php\ext\ (S:\Dev\xampp\php\ext\ on my system). To make things a little simpler we will rename the dbg-php-5.2.dll file to dbg-php.dll. Once that file is copied to the correct location we must make a small modification to the PHP configuration file php.ini . In our XAMPP system this file is located in the \apache\bin\php.ini (S:\Dev\xampp\apache\bin\php.ini on my system). We must add the extension=dbg-php.dll line to the WINDOWS EXTENSIONS section in this file.

We need to make one more change to the php.ini file. Add the following to the MODULE SETTINGS section:

- By default XAMPP MySQL comes with an admin user account (root) that is configured with no password. Create a new MySQL user before starting the Joomla installation. Start XAMPP using the TOOLS > SCRIPTS > START XAMPP option. Once XAMPP has started click TOOLS > OPEN URL, and type http://localhost/phpmyadmin to use phpMyAdmin to create a new MySQL database and user with a password. For this tutorial I created a database called Joomla, and a user called Joomla with a password of j00mla. The joomla user has ALL PRIVILEGES for the joomla database. Check the phpMyAdmin website for more details on how to create databases and users. Remember the username and password you created! You will use them Joomla installation.
- Once XAMPP is installed (and the new user created), you can add a MySQL account to access the MySQL server from PhpEd's DB Client. Click TOOLS > ACCOUNTS > NEW > MYSQL, use localhost as the HOSTNAME, I used joomla as the username, and j00mla as the password and joomla as the initial database.
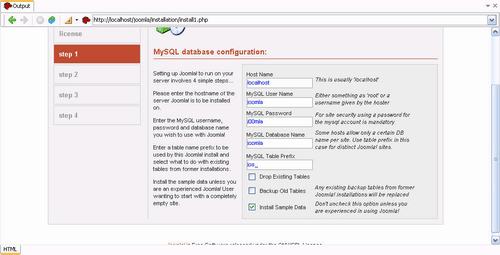
- You should now be able to perform a normal Joomla installation. Click TOOLS > OPEN URL and enter http://localhost/joomla.

Step through the installation normally providing the correct MySQL account details when required.
Be sure to remember the Joomla admin password that you enter in the last step. To keep things simple I will use j00mla as the password.

Once the installation steps are complete you will need to delete or rename the sub-directory called /installation in the joomla directory (S:\Dev\xampp\joomla\installation on my system).
Once these steps are complete our Joomla development environment is ready.
In this tutorial you learned about the setup needed in NuSphere PHP IDE to start the development with Joomla. Ben is going to continue this tutorial and cover the following topics:
- Template Development Walkthrough
- Module Development Walkthrough
- Component Development Walkthrough
- Mambot Development Walkthrough
Please check again soon and make sure you subscribe to NuSphere News Letter to learn about new PHP Tools available in PhpED. Additional technical information is available from the NuSphere Support Forum. Download a free trial of PHP IDE for PHP Designer today!
|
|
|